How To Create a Guest Account in Windows 11
How To Create a guest account in Windows 11 – On many occasions, friends or relatives come home and we have to lend them the computer to carry out some task.
But it is not a good idea that they do it with our user account, we have many things that are private and organized in a unique way; the last thing we want is for someone to come and touch things that they shouldn’t.
How can we “lend” our computer without affecting our settings and files? Simply, we have to create a guest account in Windows 11.
What is a guest account
The guest account feature in Windows has changed quite a bit over the last few years. In Windows 7 and Windows 9 creating a dedicated guest account was extremely easy.
These accounts have limited access to the computer. For example, they cannot install software or change any system settings .
In Windows 10, Microsoft made the decision to “hide” the feature. Although strictly speaking, the name “Guest” is still retained for the guest account, although users will not be able to create the same kind of account as in previous operating systems.
Windows 11 is the same as 10. The “real” guest account feature is not easily accessible.
Instead, we will create a local account that does not require a password. Although this account will give users the possibility to interact with the system without the limitations of previous versions.
New guest users will be able to install software and adjust system settings, although it will not affect the main profile.
Read Also: How To Restore Classic Volume Mixer in Windows 11
How To Create a guest account in Windows 11

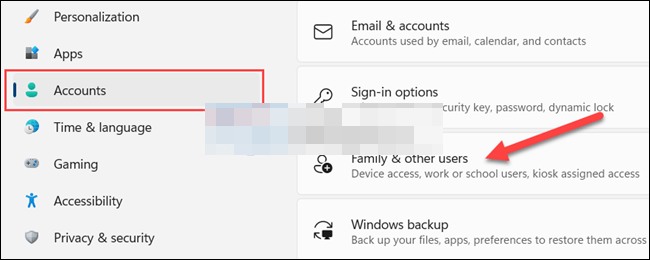
The first thing we will have to do is open Settings, for this we will have to press “Windows + X” and we will go to Accounts> Family and other users.

In the “Other users” section, we will have to click on “Add accounts”.

Windows will ask to sign in with a Microsoft account. But it is not what we will do, we will have to click on the link that appears just below and that says “I do not have the login information of this person”.

Next, we will click on “Add a user without a Microsoft account”.

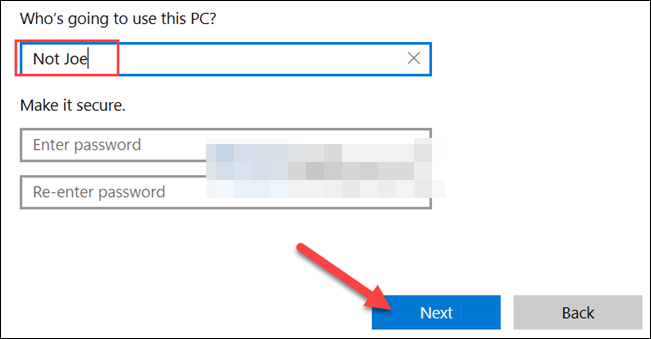
Now we are going to have to enter a name for the guest account. The password fields can be left blank, so that it is not requested when using the account. Then we click on “Next”.
Read also: How To Disable The Lock Screen in Windows 11?
This account will appear next to the others that already exist on the computer. It will not ask for a password and can be used as a guest account.